(This blog post is an older blog post but I'm constantly adding to it and updating it to make sure it continues to be a relevant resource.)
Table of Contents
ToggleI can now officially call myself an Amazon best-selling author.
About two weeks ago, I did a blog post about how I'm going to write a book, publish it on Amazon and add a new revenue stream to my business. I put the challenge to myself out there for the world to see and got to work.
That same evening, I got to work writing my book about WordPress. Over 12 nights, I worked on my book from the hours of about 10pm until 2am, making sure that I got at least one chapter done each evening.
On August 13th, I officially posted my book on Amazon.
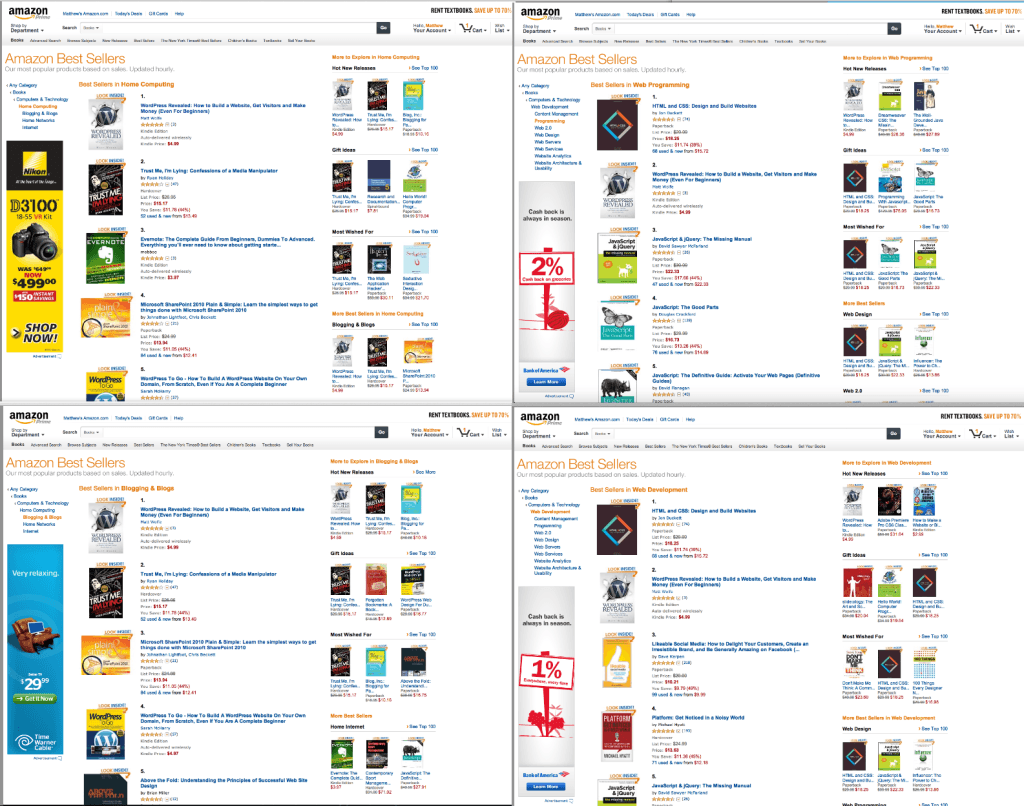
On August 17th, thanks to the power of Facebook and this blog, it reached #1 best seller status in the “Blogging” category, #1 best seller in the “Home Computing” category, #2 best seller in “Web Programming”, #2 best seller in “Web Development”, and the #5 best seller in “Business & Culture” (right below the biography on Steve Jobs). How freaking cool is that?
(Click the image below to see it larger)
The book, entitled WordPress Revealed, sold over 100 copies on August 17th, giving it enough sales to knock it in to the best selling spots in all those categories.
One of the beautiful things about the way that Amazon works is that, once you're in a best selling category, you tend to stay there because the mere fact that you are in the best seller list boosts your exposure and increases sales.
What I'm going to lay out in this, potentially massive, blog post is exactly how I managed to create and sell my best selling book on Amazon. In reality, I should be splitting this in to multiple posts… But I just feel like making a single, all-inclusive, resource right now…
Step 1 – Create the book
I'll be honest here. This IS going to be the most difficult part of the entire process. Getting started writing is not easy. People tend to open up their word processor and stare at a blank screen and instantly become overwhelmed at the mammoth task ahead.
The first sentence is always the hardest too. Once you start writing and you get that first sentence out there, people typically find that they can get in a flow and just keep going with it.
Getting past the overwhelm.
The way that I got over this overwhelm of a blank screen was that I leveraged this blog and asked for your help.
I created a blog post and asked for your number 1 WordPress question. I offered up a free copy of the book to my favorite questions.
I was then able to copy all of your questions over to a document and just start answering them… This got me past the overwhelm of having a blank screen.
Some alternatives to this would be to use a place like Fiverr. Hire someone that offers to do research and ask them to research the top 50 questions on your niche and provide you with a list of those questions… Boom, you've instantly got something to work off of to get started.
Another way that I just get down to it when it comes to writing is to create an outline first. I just begin by listing out all the different things I could potentially talk about in to a document. I'll come up with 10-15 topics for the book. I'll then organize them in to what I feel is a logical sequence and remove any topics that just don't fit in to the flow of the book. At this point, you can now just start fleshing out sub-topics of each topic.
Having an outline allows you to have a starting point to just go back and fill in the details. It's always helped me and it's usually how I compose blog posts as well.
What Word Processor To Use…
Personally, I really like working with OpenOffice. I've found that when I upload files to Kindle, .doc files seem to work the best without messing up my formatting too badly. OpenOffice (which is 100% free) let's me save the file as both a .doc file as well as a .pdf.
I like to save it in both file formats. The PDF version is so I can give out free copies to people for review and the DOC file is the one that I actually use when uploading in Kindle Direct Publishing.
Creating a table of contents…
I haven't seen this taught anywhere else yet. I had to figure this out from lots and lots of experimentation…
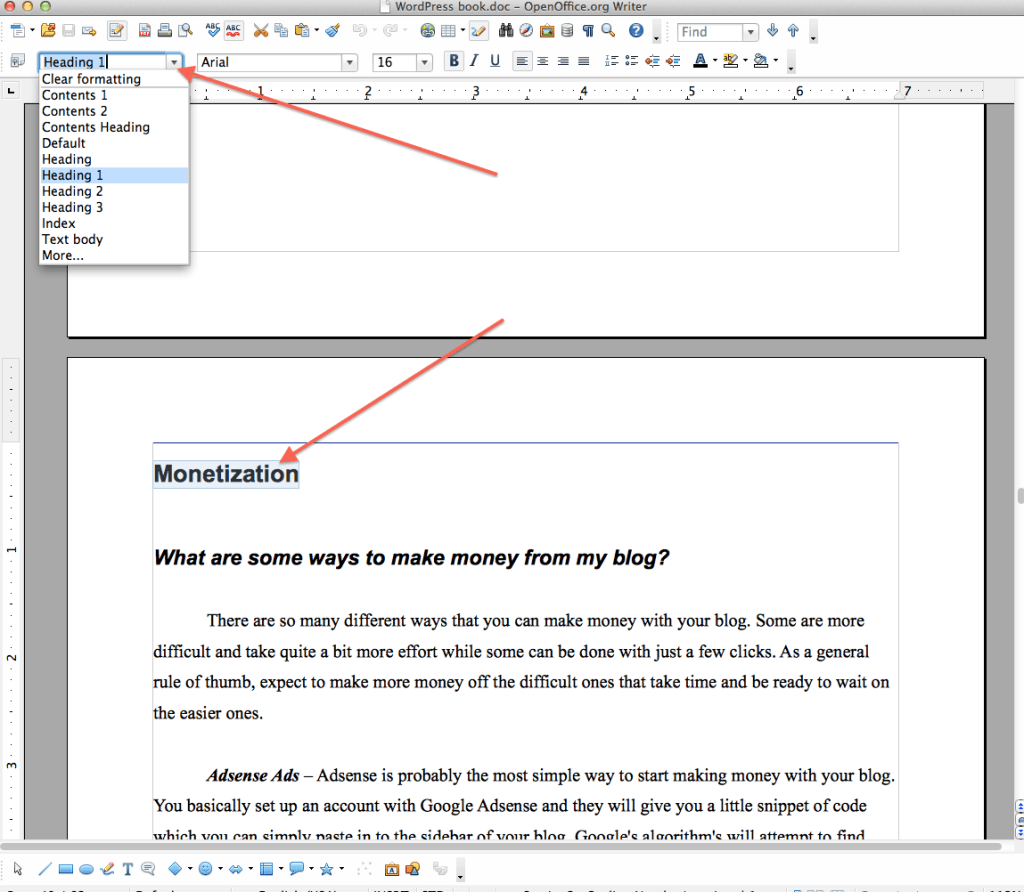
As you're writing you book, make sure that the title of each chapter title is set to Heading 1. This will help when we go to create the table of contents after the book is completed.
After you've finished writing your entire book and you've made sure that all of your chapter titles are formatted with “Heading 1”, you can easily scroll back to the beginning of the book and create a real quick table of contents.
I'll do my best to explain how to do this in OpenOffice. I don't know how to do it in any other Word Processors but it's looked great so far using this method.
Scroll all the way up to the beginning of your book, before your actual content starts. This is where we're going to put our Table of Contents.
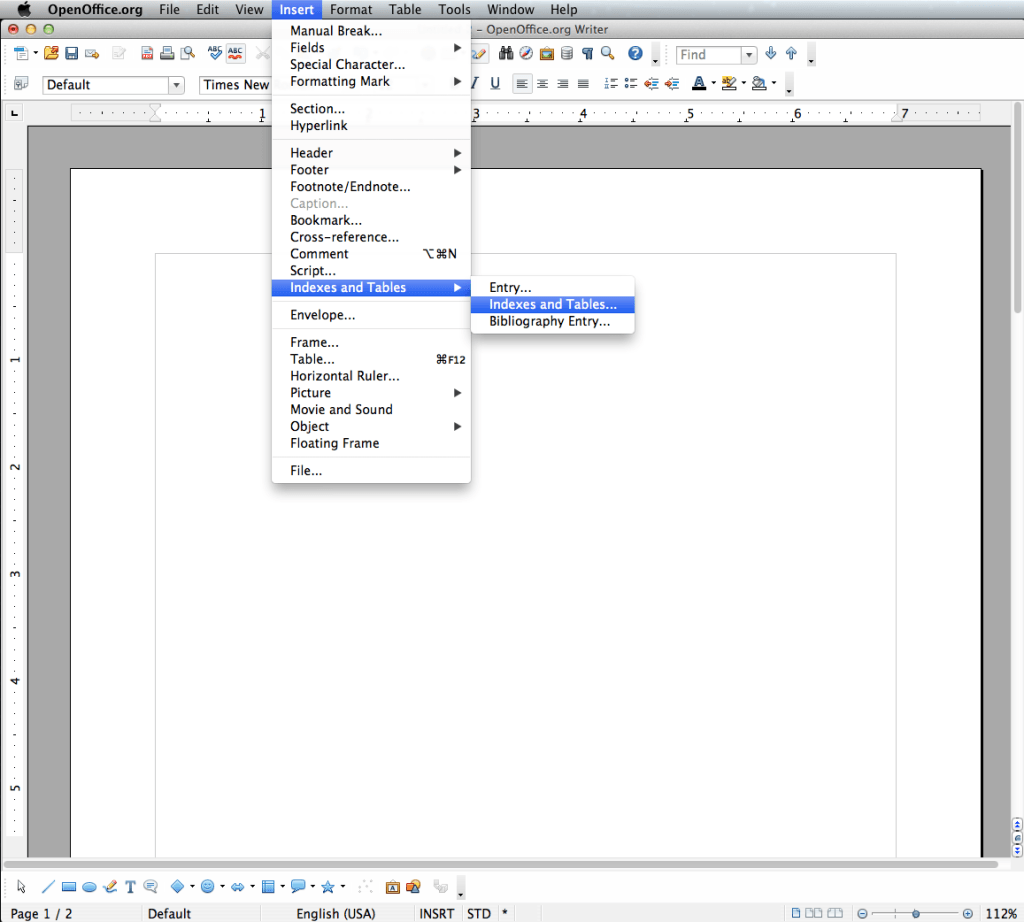
On the top menu, click on “Insert” then click “Indexes and Tables” then click “Indexes and Tables” again. This will take you to the page where we create the Table of Contents…
On the box that pops up, we're going to click on “Entries” tab at the top…
The way that OpenOffice is set, it defaults to as if you were going to do a print book. It will have page numbers and dashes. This is not relevant to us since Kindle books don't actually have page numbers.
We also want clickable links in our book. So, if someone clicks on a link in the table of contents, it jumps them to that section in the book.
We need to tweak some settings. This part is a bit difficult to explain but I'll do my best.
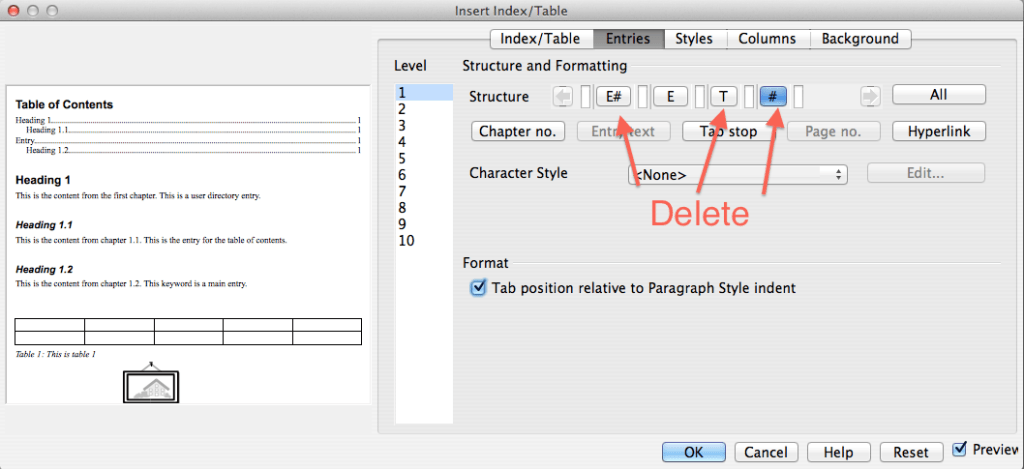
You'll see an area that says “Structure” with a few buttons like “E#”, “E”, “T”, and “#”.
We're going to click on “E#” and hit delete (fn+delete if on a Mac). We're then going to delete “T” and “#” as well…
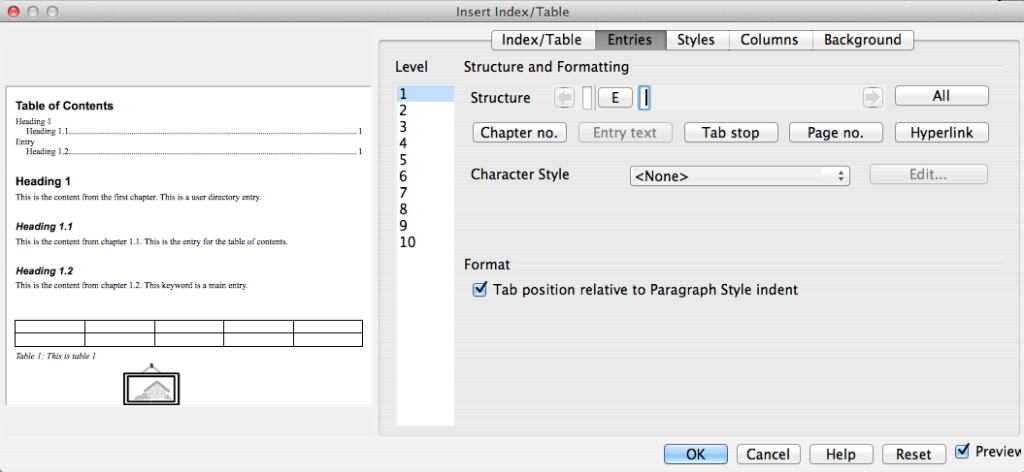
We should now have a screen that looks like this… (Only the “E” next to structure)
Now… See that little white box to the left and to the right of the “E”?
We're going to click inside of the little white box on the left so that you see your cursor blinking inside of it.
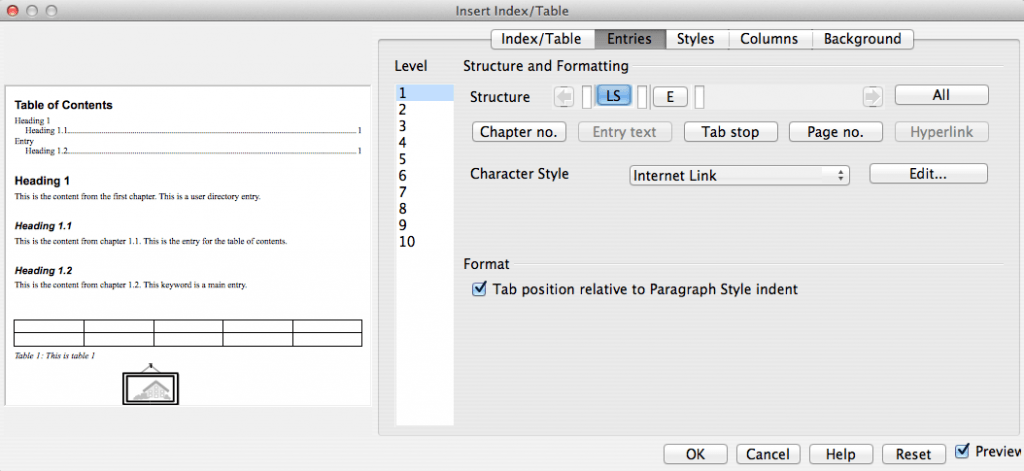
We are then going to click on the button that says “Hyperlink”.
This will add a button that says “LS” next to the “E” button. (LS stands for Link Start)
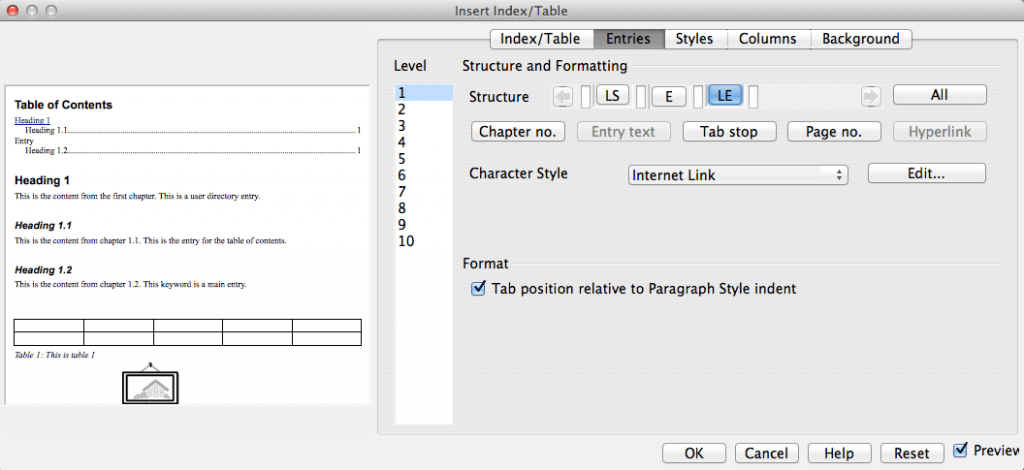
Now we're going to click in the box to the right of the “E” so that the cursor is blinking inside that box.
Click “Hyperlink” again and you'll see a box to the right of the “E” that says “LE”. (LE stands for Link End)
Now you can go ahead and click “OK' at the bottom of the box and you should see your Table of Contents appear inside your document with clickable links. Go ahead and test clicking on the links and make sure they take you to where they are supposed to go.
The cool part is that those links will work on pretty much any device that people can read Kindle books on.
That was one of the most complicated things for me to figure out when trying to publish this book. So there you go… That's what I do and it works like a charm.
Step 2 – Get an awesome cover made
So you've got your book written now and it's super awesome! You've even got a really cool Table of Contents that people can click on. Neato. Now we need to create a cover for this bad boy.
If there's anything that I've learned so far when it comes to Kindle books, it's that covers sell books. (AKA people judge a book by its cover)
It is possible to upload a book to Amazon without adding a cover. Amazon will just use its default cover which looks like junk.
You can absolutely do this if you want no one to ever buy your book.
I've found two ways that work well for me to create awesome book covers that sell books. Unfortunately, both ways cost money and one way will cost you quite a bit more than the other.
The expensive way (but best way) is to crowdsource the design on 99designs.
When I wanted to create a book cover for WordPress Revealed, I wanted the cover to look super professional. By going to 99Designs, I was able to tell the site how much I wanted to spend on the cover… Oh say $200. Designers would then go on 99Designs, see my offer of $200 and submit book cover ideas to me. I get to see 15-20 concepts for cover designs and then pick my favorite and pay the winner.
This worked well for my book and the winning designer will probably be getting even more work out of me. If you want to go the pro route and don't mind spending a little to get there, this is probably the best way.
The second, less expensive way, is to purchase stock footage off Deposit Photos.
Deposit Photos is probably the least expensive source that I've found to purchase stock images that you can use for commercial purposes. There are other places to find stock images for free or for cheaper but the quality just isn't the same.
For the most part, I simply do a search for images that are related to my topic. For example, if I was creating a book on WordPress, I'd probably start by searching keywords like WordPress, blog, blogging, computer, laptop, etc… I'd look through the images that were available and try to find one that looks like it would make a good book cover on its own.
A lot of the images are already close to the right shape to be a book and they already fit your theme, they just need the title and author and you've got a book cover.
I'll find an image I like, purchase it for $5 or so, open it in Photoshop or GIMP and simply add in my title and author name in a nice font. I've made some really great looking book covers this way.
Here's a tutorial that I made on how to make a cool book cover with stock photos.
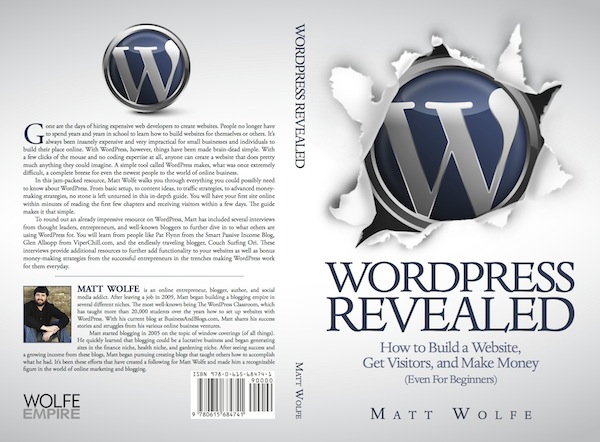
I went the 99 Designs route with my latest book and was very happy with the result…
Step 3 – Create an opt-in page
This step may seem a little bit strange in the context of a book but I've found it to be very very important to the marketing process. It will also be a huge asset to you when you go to release a second or third book.
An opt-in page is basically a website online where you can collect the email address of the people that purchased your book. Amazon does not provide book sellers with this information, therefore, you need to ask for it.
To do this, either register the domain name of your book or use a subdomain on your existing site. For example, I tried to get WordPressRevealed.com but it was already registered by someone else. So instead I created an opt-in page for buyers at TheWPClassroom.com/WPRevealed/ (this URL no longer works).
On the page I offer to give bonus video training of how to set up WordPress in exchange for an email address.
I'm not going to dive in to how to create a website or how to create an opt-in page in this little tutorial because that's the sort of thing that I really dive deep in to inside the book and inside the WordPress Classroom. However, it is very simply to do with a tool like Clickfunnels (Clickfunnels vs Leadpages).
Now, inside my book, at the beginning and at the end, I mention that people can go to my website to get actual video training of most of what I teach in the book. I give the readers my opt-in page link and hope that a good majority will go for the bonus training and give me their email in return.
Once I've got their emails on my list I can do several things…
I can email that mailing list and ask them to leave a review on Amazon (boosting sales and credibility).
I can email that list and inform them of a new book that I release.
I can email that list and promote my other products like the WordPress Classroom.
I can email that list and promote related affiliate products.
It opens up so many opportunities to further push sales of existing and new books.
I highly recommend implementing this strategy in to your book marketing.
Step 4 – Create an account as a Kindle Direct Publisher (KDP for short)
Once you've got your book written, your book cover, and your opt-in page, it's time to create a KDP account and submit your first book to the store.
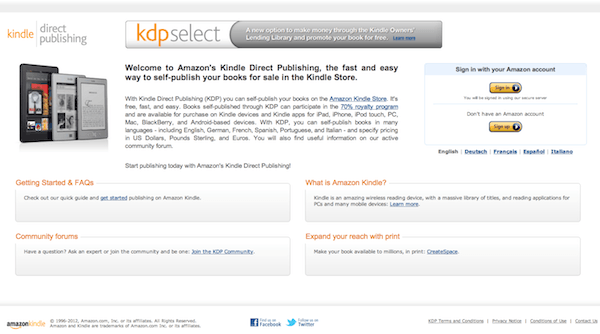
To do this, we need to create KDP account, which is really as simple as going to http://kdp.amazon.com and signing up…
Once you've signed up, you'll see an area called your Bookshelf…
Go ahead and click on “Add new title” because this is where we're going to add our latest book…
Step 5 – Adding your book in to Amazon
For the most part, this is pretty straight forward from here on out…
Type in the name of your book.
When selecting a title for your book, be very descriptive (especially important in non-fiction). If I just named my book “WordPress Revealed”, it probably wouldn't do that well. However, because I titled it “WordPress Revealed: How to Build a Website, Get Visitors and Make Money (Even For Beginners)”, it probably made a lot more sales. The title is very descriptive and actually lists the benefits of reading the book.
Write a description that's going to help sell the book.
In the description, I like to put a lot of benefits as opposed to just describing the book. Try to describe what the reader's end result from reading the book will be instead of just describing what the books about. For example, if I'm doing a book about how to grow tomatoes, I wouldn't simply describe the book as a book on tomato growing… I would use language like “Imagine yourself biting in to the most delicious tomato that you've ever tasted, imagine the satisfaction of knowing that you just picked that tomato from your own garden only minutes ago… You will be so amazed at what simple tweaks to your soil could do for the flavor of the tomatoes as well as how much faster they can grow…“.
That description is total B.S… Seeing as I know nothing about tomato growing. But you get the idea. You can really describe the benefits of the end result of purchasing the book. You can also give a little teaser of what they'll learn, leaving them wanting more (the simple tweaks)… With Amazon, even the simplest of sales copy can be very effective because you are already borrowing on Amazon's credibility.
I personally leave language at “English”, I leave publication date blank (it will fill in today's date by default if you keep it blank), for publisher, I use my publishing company that I've began creating books under (but you can leave it blank if you want), and I leave ISBN blank for Kindle books…
Select “This is not a public domain work and I hold the necessary publishing rights.” in the section where it asks.
Now… For categories, you have the ability to pick 2. So look through the categories that they provide and choose two that best fit your book's topic. These categories don't always match the categories that they will actually rank under inside Amazon. It's a bit strange. Just pick the most relevant.
For “Search Keywords”, type the things that you think others would type to find your book. You can have up to 7 search terms so choose wisely. For example, for my WordPress book, I want people who type “WordPress” in the search to find my book. I also want to show up when people search “WordPress For Dummies” or “How to create a website”… Those are all terms that, if people searched them, would probably find my book relevant.
Now you can upload the book cover that we created in step 2 and then browse for your book file (in .doc format) and upload that as well.
Where it asks about “Digital Rights Management”, I always select “Do not enable digital rights management”… This allows people who buy my book to read it on multiple devices if they choose.
Click “Save and Continue” to move on to the next step.
On the following page, we get to set our price.
I usually select “Worldwide Rights”, making my book accessible to any country's version of Amazon…
For price, we have options…
Amazon's pricing structure is weird when it comes to what your royalties are.
If you price your book between $0.99 and $2.98 you can receive a 35% royalty on any book sold.
If you price your book between $2.99 and $9.99 you can receive a 70% royalty on any book sold.
If you price you book $10 or more, your royalty drops back down to 35%.
There are two schools of thought at this point. You can charge $0.99 and make $0.35 for every book sold and hope to get massive volume and a lot of opt-ins on the opt-in form we created… Or we can price between $2.99 and $9.99 and get higher commissions per sale.
It really comes down to your motives. If you want a lot of volume and a lot of leads generated to an opt-in page, $0.99 is probably better. If you are trying to generate a good income from Amazon books, pricing above $2.99 is probably better.
For me, I've found that $4.99 is about the sweet spot for my books. I can get the 70% commissions and the book price is still low enough to keep it somewhat of an impulse buy.
I would just really decide what your motives are and test what works best. Set it at one price for 30 days or so and see how it does. Then test a different price after 30 days… Repeat until you find the “Sweet spot” price.
Finally, where it asks if I want to allow lending, I always check yes. When people borrow one of my books I still get a little money for it. Lately, it's been about $2.00 per borrow which, in some cases, is more money than I make when someone actually buys the book. So I like to keep this option checked.
Confirm that you've read the terms and conditions and click “Save and Publish”.
Give it 12-24 hours and your book will be live on Amazon!
Step 6 – Create an Author Central Page
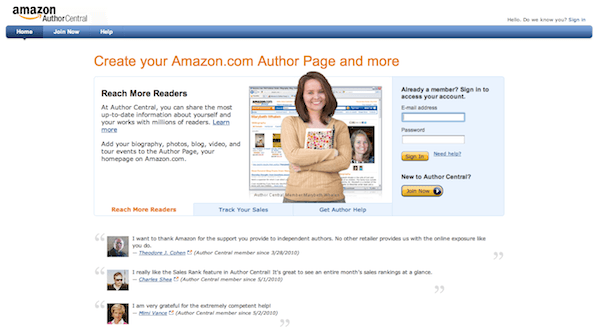
With Author Central you can edit your editorial reviews, your books description, your personal profile on Amazon, track book sales, and much much more. This is critical for anyone serious about making Kindle work for them.
After your book is finally live on Amazon, you can go to http://authorcentral.amazon.com/ and create an account.
Login with your existing Amazon details and register for your account.
Once you're logged in to Author Central, click on the “Books” tab at the top of the screen.
Click the button to “Add More Books”.
Do a search for your book. When you find it, click the button that says “This is my book”.
Your book is now linked to your Author Central account.
Next, click on the “Profile” tab at the top of the screen.
I recommend adding a photo and a biography about yourself. The biography will be added to your actual book sales page and helps people browsing books get to know a little more about you. Most people who sell Kindle books skip this step. It's just one more thing to make your book page stand out.
You can then jump back to the “Books” tab and click on your book that you just added.
From here you can add reviews from credible sources and edit your book's description with extra formatting like bold italics. Doing these things just makes your book stand out among all the other Kindle sellers that don't do this.
Step 7 – Marketing the Book
Admittedly, marketing Amazon books is not easy. Other than writing the actual book yourself, this will probably be the next hardest part.
Often times there's a bit of a “catch-22” here… Your book needs sales to start selling.
If the book has 0 sales it doesn't really move up any best seller lists and it doesn't really begin appearing in people's searches. Once it has a couple sales, it will start to get noticed a little more naturally and you'll start seeing sells come in from random Amazon buyers…
Some tips to get the ball rolling…
1. Post that you're now a published author on Facebook, Twitter, and any other social networks you're a part of. Leave a link back to your book so people can grab it.
2. Purchase your own book. This sounds a little lame but it's actually pretty important. If you purchase it yourself you can actually make sure it looks ok on all of your Kindle reading devices. It also registers as a sale in Amazon and begins your boost in seller ranking.
3. Gift the book to several people and ask them if they'd leave reviews. You have to pay to gift it to people but you actually receive your royalty back so you're not actually paying full price. This does a couple things… It registers each gift as a sale and helps move you up the rankings. It also prompts people to start leaving reviews. Reviews help make sales.
4. If you have a mailing list, mail that list about the book. If you have a blog, write a blog post about the book.
5. Tell friends and family about the book and ask them to purchase and leave a review.
6. Put author of (book title) in your email signature with a link to the book.
All these things are ways to get the first initial boost in sales so that Amazon notices you and helps move you in to a postion where sales happen naturally.
Once your book starts to sell and people start to give you their email on the opt-in page, make sure to mail that list and ask them to leave reviews for you. The more reviews you have, the more important Amazon tends to think your book is.
Bonus Resources
That's about it… That's my whole process that I used to create my book and take it to a #1 best seller on Amazon.
I didn't learn ALL of this from trial and error. I actually did follow some great other resources that helped me along the way.
Here's some of the resources that I recommend that really helped and some new ones that have popped up recently to help you. Some of these links are affiliate links… However, they are ALL things I have used myself to help me see the results I've seen with Kindle publishing.
9 Killer Tips To Effectively Market A Book – This a blog post I wrote long after I completed the post that you just read. This post was written after I had a little more time to really experiment with Amazon and learn the ropes even more. See what advice I have two years after publishing my book.
How I Sold 1 Million eBooks in 5 Months By John Locke – John Locke is literally a millionaire from Kindle publishing. I've heard his name over and over again when I was studying the Kindle stuff. When I saw that he had a book about how he did it, I had to grab it. It had some really great advice as well. I'm not completely through it yet but it's a really interesting read so far. (It's a $3 Kindle book)
WordPress Revealed – I had to throw this in here… This is my book that I just released. Check it out, study how I created the sales page, how I weaved in my opt-in page to collect email addresses, and learn a thing or two about WordPress while you're at it. It's been getting some great reviews so far and I know that it's really helped a lot of people out.
How To Write A Book In A Weekend
Chandler Bolt – A 3 Step Process To Envision And Write Your First Book
Clickfunnels – For creating the lead capture page to send people to when the book is live.
Conclusion
Phew… That was a marathon blog post. I didn't mean for it to be as long as it did. I just wanted to make sure that I didn't leave anything out.
Despite my best efforts, I'm sure there are still some questions. I'd love to hear them and I'll do my best to answer them.
If you enjoyed this post, share it on Facebook, bookmark it, like it, etc… I really put a lot into this one and I really hope that you got something out of it.
Now go get your first book done!

